
Having recently bought and built a Calder High Sleeper Bed (paid link), I thought I'd leave a brief review here, together with a few tips when it comes to building it.
Review: What is it
The Calder is a "high sleeper bed". These are single beds at top-bunk height. They either have space underneath for a desk, wardrobe, drawers or shelves (or some combination of these), or have some of those items all built in as a single item of furniture. The Calder has a desk with 3 drawers underneath, and a wardrobe, all built in.
The Calder is well laid out. Some high sleepers have a ladder with just thin metal bars (which could be painful in bare feet), or have a ladder that sticks far out into the room. This has a ladder with proper wooden rungs, but it built vertically into the side of the bed, with a proper recess to give room for feet.
The Calder is available in a wide choice of colours (all are particle board with a veneer).
- White (paid link)
- Oak (paid link)
- White with high-gloss black (paid link)
- Beech (paid link)
- Pink and white (paid link)
- Blue and white (paid link)
- Black wood grain and walnut (paid link)
Review: Delivery
All the colours / styles said they'd be delivered in 1-3 weeks. In fact, ours arrived within 4 days, and from reviews on Amazon this is not unusual. Clearly, if you needed it in less than 3 weeks, you order at your own risk and should probably contact the seller first to check stock.
The delivery arrived in 4 flat-packed cardboard boxes. They are labelled with your name and the exact model you ordered, with boxes numbered "1 of 4" through to "4 of 4". Check you have the right ones before signing for delivery. In practice, that means asking the driver to let you check as they unload the van, because these are heavy boxes. Each box has its weight on: They weigh 41kg, 39kg, 36kg and a measly 29kg for the lightest box. Yes, that totals 145kg, or just shy of 320lb.
The bed is therefore heavy, and also big. Build it both in the room you wish to use it in, and indeed (when you start assembling the final frame) as near as possible to where you want it in the room.
Review: Assembly and Instructions
One of the boxes has a sticker on the outside to let you know that the instructions and screws / fittings are in that box. This is helpful, although you'll find you need something from every box by the time you reach step 4.
Helpfully, the screws and fittings come in several different plastic bags, rather than all in one, grouped by different types of fitting. Within the screws bag you'll find a smaller bag containing all the screws of one particular size, and two other small bags with the nails / pins you'll need for securing the hardboard back pieces. This is thoughtfully laid out.
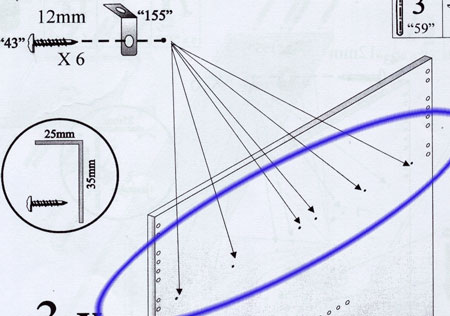
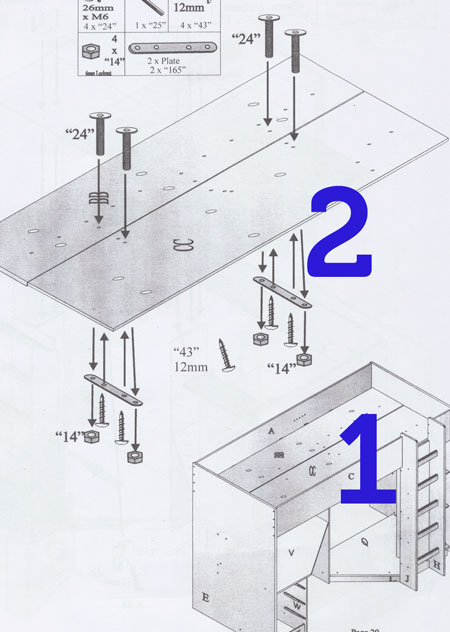
Page 1 of the instructions gives you a picture of each type of screw or fitting, together with its name and its dimensions, and also how many of that type you are given. This is helpful for identifying exactly which is which. You then get two pages detailing each piece of wood by letter. What would have helped is for them to give the dimensions of these. Nevertheless, the pictures are roughly to scale here. They also attached a small sticker with the letter to each piece of wood. However a number of these fall off in transit. I'd advise unpacking all the wood, and labelling so you know you've not got any two pieces mixed up.
The instructions are then clear, step by step. You get shown an exploded diagram of what to put together in that step, showing what screws or dowels go through which exact holes. More tips on assembly follow below. In most steps, you also get another diagram showing what the finished pieces should look like, another thoughtful detail missing from many flatpack instructions.
With one exception (see below) every hole was in the right place, and no holes were missing. Everything goes together exactly as the instructions say.
Expect this to take 6-8 hours. Some steps are easier with two people, and 3 or 4 steps require two people to avoid snapping joined pieces that are not yet properly secured.
Review: Build Quality and Design
All in all, this is an excellent piece of furniture. The pieces fit together tightly and are well secured. Did I mention it's heavy? It's a sturdy piece that will be robust and last.
The only point where the build quality is slightly disappointing is in the under-desk drawers. These are the standard design, - a hinged 3-piece of wood wraps around a hardboard base, and then the front of the draws attaches on. However the whole drawer is held together only with two dowels and glue; most drawers I've built also have screws.
In terms of the design, a plus-point (that doubtless contributes to the weight) is that the base on which the mattress goes is solid particle board (with some 1" ventilation holes), rather than slats. Because this is a top-bunk, the maximum thickness of mattress is 6" or 15cm. The problem is that thinner mattresses can leave you feeling the bed slats through the mattress. By giving a solid base, this won't be a problem.
Note that the mattress size required is 90cm by 200cm — this is a European / IKEA sized single mattress, not the UK standard of 190cm long.
There are two pieces of design that are slightly puzzling, and a small negative. Both the desk and the wardrobe have their back some 30cm or so forwards from the back of the unit. This means there is a cavity behind the desk and wardrobe, where the desk and wardrobe could both have been deeper. I'm not quite clear what they gained by designing it in this way, but in my opinion it's a slight opportunity lost.
Construction Tips
Now for a few small tips and tricks for building the bed. As I say, the instructions are mostly excellent, but these few tips may help.
Step 1: The holes are marked
In step 1, you take piece "E", and you screw in a number of right-angled brackets. The diagram for piece E shows lots of holes in the wood, but when you look at your piece E you cannot see the holes where the brackets go.
That is because the screws are self-tapping, and the holes are not pre-drilled. But everything is marked. Look very closely at the piece of wood, and you'll see a small but definite dimple where each of those screws needs to go. So you don't need to guess; you can attach the brackets exactly where they need to be for later.
Step 3: Right Angled Brackets
In step 3, you attach some metal right-angled brackets onto pieces A, B and C, just as you did with E and F in steps 1 and 2.
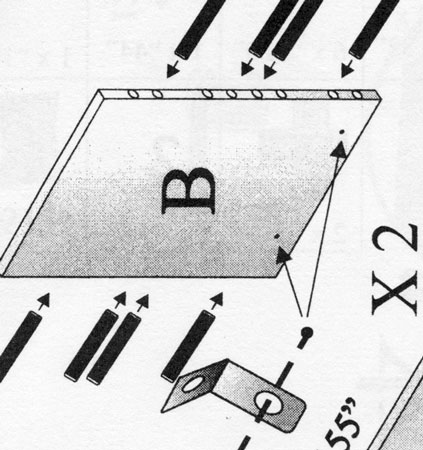
In Steps 1 and 2, there is a diagram showing what this looks like after the brackets are attached, and the brackets go in the middle of the piece of wood. Here, in step 3, the brackets now go along the edge, and there is no picture of the finished piece.
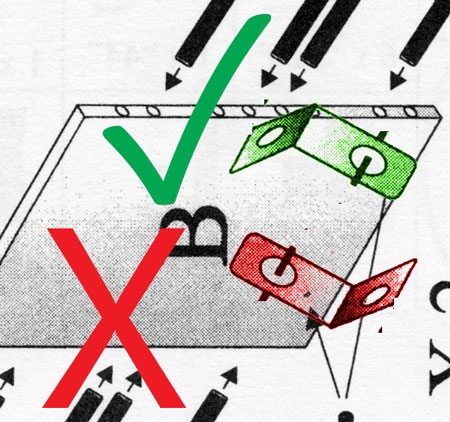
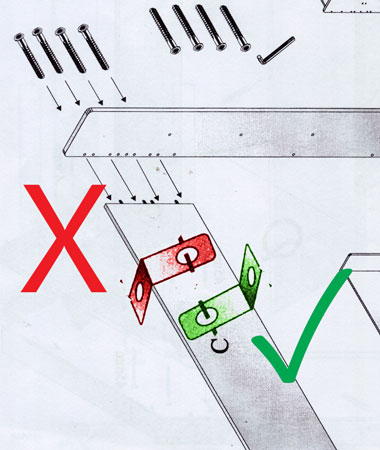
The brackets need to go so that the piece of metal that sticks out is away from the edge of the wood, not flush with the edge of the wood.
Step 8
Here, you attach pieces B and C to pieces H and J.
H and J are the sides of the ladder. B and C are the sides of the bed itself. So you're effectively attaching the bed sides to the top of the ladder.
The diagram does not show you which way up to put B and C, because the right-angled brackets (just described) are the other side of the wood from that shown in the diagram.
The answer is: Attach B and C so that the right-angled brackets (attached in step 3) are at the bottom of B / C, not right at the top. The right-angled brackets do stick out of pieces B and C away from the ladder (which is why you can't see them in the diagram). (The bed base will eventually rest on top of these).
Here's a modified copy of the diagram from step 8 to show what I mean when I say that they go at the bottom of pieces B and C:
Step 11: Where do you build
Step 11 is where you start to put together some of the components you've assembled thus far. You'll start to see the bed take shape, from the footboard, through the desk and drawer frame, extending to the ladder-side nearest to the foot of the bed.
This is the stage to decide where in the room you want the bed. Even if it's going in a room that's large enough that you could turn the bed with some ease, it's heavy and you won't want to move it more than you need to.
So, place the bed roughly where it will go, but out from the wall on all sides. In particular, you'll need space to get round the back to put the wardrobe back on (which is a little fiddly until you have a couple of nails in place), and you'll need space to get behind the head end of the bed to put the headboard in place (which is fiddly because of the sheer number of holes that have to align.)
Step 16: Putting the mattress base onto the bed frame
The bed base comes in two parts. Note, the parts have holes pre-drilled into them that you'll need later. The two parts (labelled "BB" and "CC") are not the same, and they are not symmetrical. So make sure you put the right pieces in the right places, and the right way around.
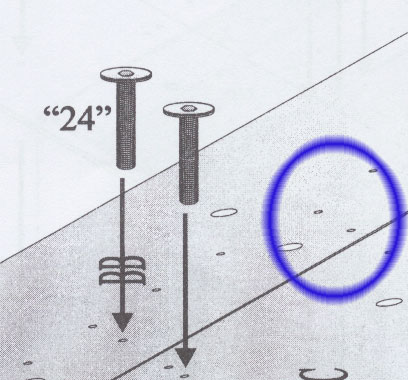
In particular, BB looks like it's symmetrical head-to-toe, so that you could put it either way up. In fact it's not: there are two holes nearly (but not exactly - that's the point) half-way along that have to line up with the right-hand side of the desk. If you have the instructions in front of you, I'm talking about these holes:
The other thing to say about Step 16 is that it looks like you join the two halves of the bed base to each other, and then lift them onto the supports in the bed frame. (It looks like that, if you work from top to bottom of the page).
In fact, that's not how it's done.
- You'd struggle to attach the two pieces together on the floor, as you need to get underneath and on top of the bed base pieces.
- You'd struggle to see exactly which way round BB needs to go (as described above) unless it's actually on the bed.
- You'd struggle to line the two pieces up exactly: There's a small gap between BB and CC, but with a bit of give in the bolts you need the pieces in the bed frame (where they fit very snugly) to see exactly how spaced they should be.
So: First lift the two pieces onto the bed frame, and then join them together.
Step 20: Doesn't quite fit
This is the only place where I found the holes not to be lined up quite correctly.
As part of step 20, you will attach piece S to the underside of the bed base. This piece of wood makes sure there is no gap between the bottom of the bed and the top of the closed wardrobe doors.
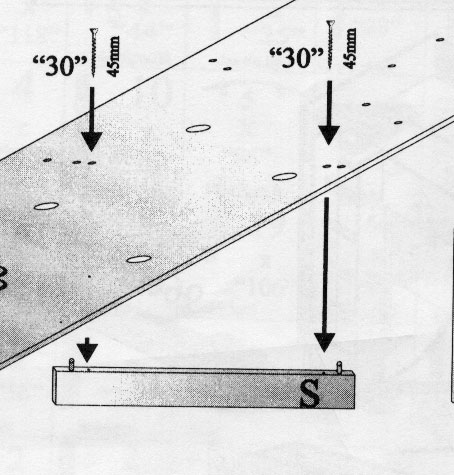
Maybe it was just our unit. The two dowels were correctly spaced to fit into the two holes in the underside of the bed. But you couldn't make the dowels fit in the holes because the ladder-side and the side of the desk were in the way of the very edges of piece S.
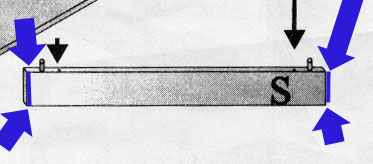
They were only just in the way. If you held piece S at an angle (tilted towards you), the tops of the dowels fit. But you couldn't push it in at that angle without snapping the dowels.
It's only out by such a small amount that this is easily solved. Simply sand off the two short edges of piece S that are nearest to you until it fits.
Happy Building!
Here are those links to the different styles available:
I managed to surmount the issue of two parts being labelled as E rather than one of them being labelled F with relative ease. What was harder to deal with was the measurements of the room I gave to the wife resulting in a piece of furniture which was longer than the room! As an experienced DIYer I chose to reduce the length of the furniture by 4cm rather than demolish a wall! Thankfully the matress was of a size to permit that without issue. Currently at step 13 of 21 after 11 hours. Time to sleep. Off to work tomorrow but I know what awaits me when I get home ... and it's not just a roast dinner! Must pop in to Screwfix/B&Q to get some brackets on the way home to ensure minimum wobble and maximum reassurance.